Two solar panels, a small microinverter, and an outlet connection. That is a pretty appealing way to get into solar without committing to a $30,000 rooftop installation.
My plug-in solar setup cost about $1,000 out the door. Around noon, I checked the app and saw roughly 718 watts coming from two panels sitting in the yard. That is useful power, not just enough to charge a phone.
The idea is simple, but a few details really matter: whether it is allowed where you live, what equipment you use, how the system behaves during an outage, and what the electricity it produces is actually worth. Here is how my setup works and what I would check before buying one.
Table of Contents
- Key Takeaways
- How Plug-In Solar Works
- Check the Rules Before Choosing Equipment
- The Equipment in My Two-Panel Setup
- What Two 450-Watt Panels Actually Produce
- Monitoring Production With the App
- Where the Power Goes in a Home With Solar and Batteries
- Plug-In Solar Versus Charging a Portable Power Station
- A Related Project: Solar on My Garage Roof
- Safety: Anti-Islanding and Equipment Certification
- Cost, Savings, and Payback
- A Small, Practical Way to Start With Solar
Key Takeaways
- Two 450-watt panels produced about 718 watts during my midday check.
- Plug-in solar requires locally permitted connections and properly certified equipment with anti-islanding protection.
- A grid-tied microinverter alone does not provide household backup power during an outage.
- Payback depends on energy production, household consumption, electricity rates, and export compensation.
How Plug-In Solar Works
Solar panels produce direct current, or DC electricity. Your home uses alternating current, or AC electricity. A microinverter converts the panels’ DC output into AC power that can work with your home’s electrical system.
In an approved plug-in solar installation, that power enters through a permitted outlet connection rather than a conventional hardwired solar installation.
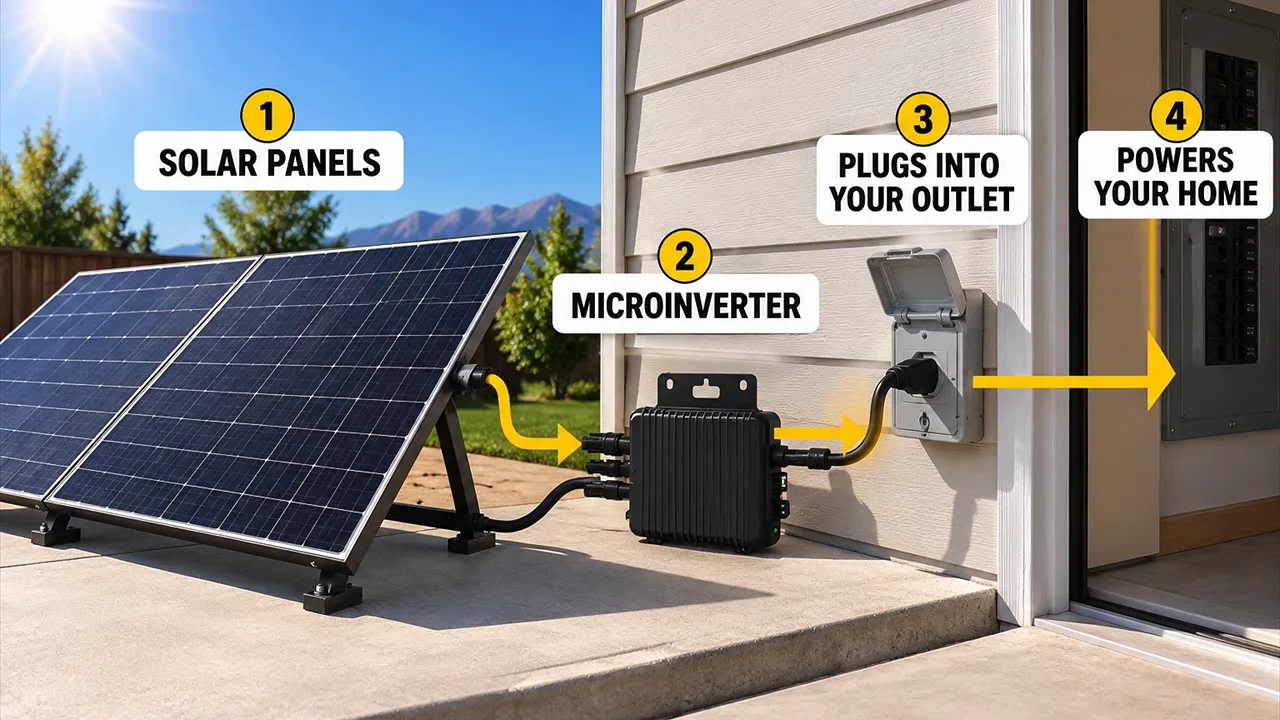
While the panels are producing, they can reduce how much electricity your home needs to draw from the utility. If production exceeds what the house is using, the excess may flow to the grid, depending on the system and applicable rules.
Reducing grid consumption and earning credit for exported electricity are not necessarily the same thing. Your utility’s rate plan determines what that exported power is worth, if anything.
That is why I like this concept as an entry point into solar. You do not need a battery just to offset some daytime electricity use, and you can start much smaller than a whole-house rooftop system.
Check the Rules Before Choosing Equipment
Here in Utah, the plug-in solar limit I am working with is 1,200 watts. That is a meaningful amount of power for a small system, but it is not a nationwide allowance.
State rules differ, and plug-in solar legislation is changing. Do not assume that a system available online is automatically legal to connect at your address, or that a rule in another state applies to you.
Before purchasing, confirm:
- Whether plug-in solar is allowed by your state and local electrical authority.
- The applicable capacity limit and how that limit is measured.
- Which equipment certifications and connection methods are required.
- Whether utility notification, approval, or other paperwork is necessary.
- Whether the intended circuit and receptacle are suitable.
A standard-looking plug does not mean you can safely use any outlet. Follow the equipment instructions and local requirements. If you are unsure about the circuit, have a qualified electrician evaluate it.
Also, putting a second system on another circuit is not a workaround for a legal capacity limit. Any expansion needs to comply with the rules for the installation as a whole.
The Equipment in My Two-Panel Setup
There are three main pieces to my setup: the panels, their stands, and the microinverter.
Two Callsun 450-Watt Solar Panels
I am using two Callsun 450-watt solar panels, giving me a combined panel nameplate rating of 900 watts. My price was about $300 per panel, although pricing will vary depending on where you shop.
These are sometimes called balcony solar panels because compatible mounting hardware can allow installation on a balcony instead of in a yard. That can be useful when ground space is limited, provided the mounting arrangement and installation are permitted.
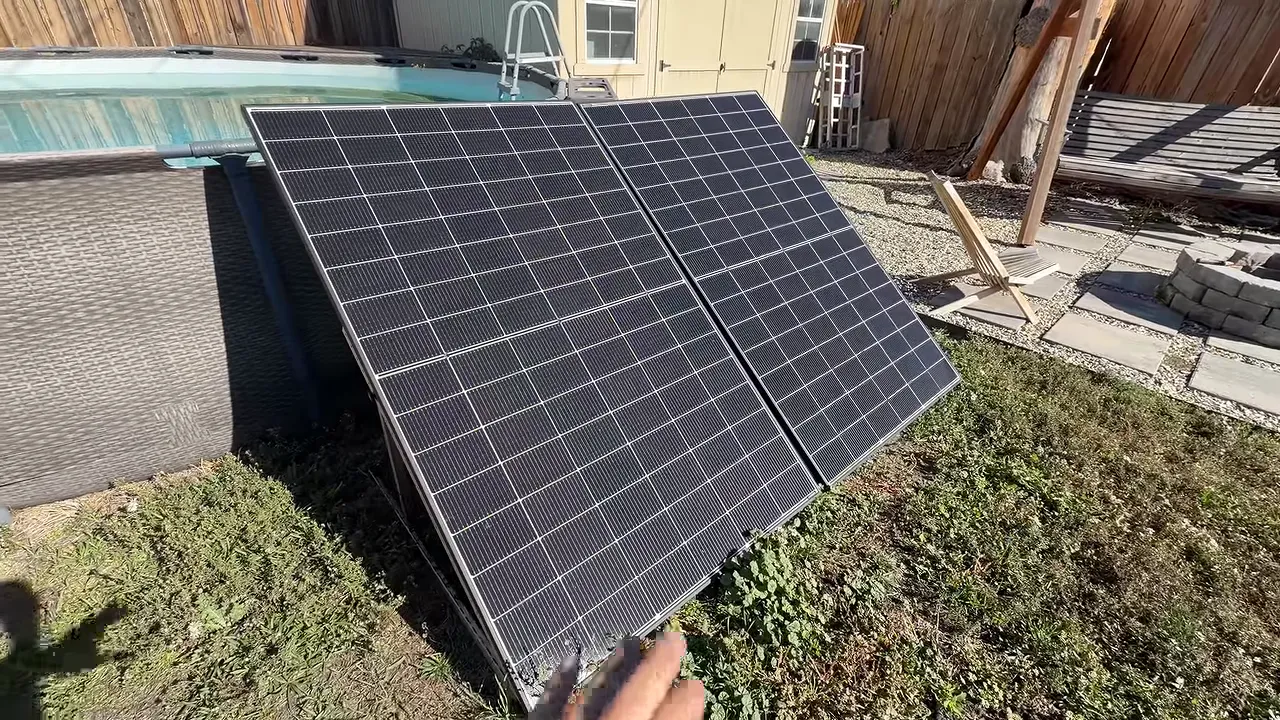
Adjustable Panel Stands
I also got the panel brackets from Callsun. They let the panels sit at an angle rather than lying flat, and they make this a convenient setup for a suitable spot in the yard.
Being able to adjust the angle is helpful when you are trying to improve output. Placement and sun exposure make a real difference, so the mounting hardware is more than an afterthought.
An APsystems EZ1 Microinverter
The microinverter in my system is an APsystems EZ1, which supports two panels. Mine cost about $250. I purchased it through Portable Sun, and similar equipment is available through solar suppliers such as Signature Solar.
The panels connect to the inverter’s DC inputs, and the inverter has an AC output cable and connector for the approved grid connection. It is a compact setup, which is a big part of the appeal.
Do not improvise the AC connection or assume an ordinary extension cord is acceptable. Use the connection hardware and arrangement specified for the equipment and allowed locally.
What Two 450-Watt Panels Actually Produce
A panel’s wattage rating is not a promise that it will produce that number continuously outside. The rating comes from controlled test conditions, and real-world conditions are different.
For planning, I expect output below the nameplate rating, roughly in the neighborhood of 20% less under the conditions I was discussing. For a 450-watt panel, I was looking for something around 360 to 380 watts in strong sun, rather than assuming a steady 450 watts.
That is a rough expectation, not a universal maximum. Actual output changes with sun angle, panel placement, weather, and operating conditions.
When I checked around noon, the app showed about 718 watts total, or roughly 359 watts per panel. The panels were not perfectly aligned with the sun, so there was still room to experiment with their angle.
This is also where the units matter:
- Watts describe power at a particular moment. The 718-watt reading tells me how fast the system was producing then.
- Kilowatt-hours describe energy over time. That is the quantity you need when estimating electric-bill savings.
A 700-watt reading does not mean 700 watts of savings all day. Production rises and falls, so the useful number for payback is how many kilowatt-hours the system generates over a month or year.
Monitoring Production With the App
One of my favorite parts of the EZ1 setup is being able to see what it is doing instead of guessing.
The app shows current production along with energy totals for the month, year, and lifetime of the system. You can also go back through individual days and compare the production curves.
That makes cloudy days really obvious. It also gives you a practical way to compare output as conditions or panel positioning change.
The inverter is Wi-Fi capable, so with the system online and the necessary internet connection available, I can check production remotely. For a small solar setup, having that information right on my phone is pretty cool.
Where the Power Goes in a Home With Solar and Batteries
My house already has rooftop solar and battery storage. When I checked the larger system, it was showing roughly 3.7 kilowatts from the rooftop panels. The small plug-in system was producing about another 0.7 kilowatt alongside it.
In my existing setup, that additional generation can contribute to the energy available for battery charging. But that depends on how the home’s solar and battery equipment is configured. A plug-in microinverter by itself is not a battery charger or a complete storage system.
Time-of-Use Rates Change the Value
We are on a time-of-use electricity plan. I have my battery set to discharge during the evening window from 6:00 to 8:00, when using stored energy is advantageous under my plan.
That is a different calculation from a household paying the same electricity rate all day. With a flat rate, daytime solar that directly offsets household consumption has a more straightforward value. With time-of-use pricing, when you produce, store, and use electricity matters.
The important point is to use your actual rate plan, not somebody else’s savings estimate.
Plug-In Solar Versus Charging a Portable Power Station
You can also connect compatible solar panels directly to a battery or portable power station with a suitable solar input. In that arrangement, you generally would not use this grid-tied microinverter between the panels and the power station’s DC solar input.
That can be a great option when your goal is stored energy or powering separate equipment. I have used solar this way myself.
The drawback I have run into is simple: once the battery is topped off, additional solar production may not be used unless something is drawing power.
A permitted grid-connected setup has a different advantage. While the sun is out, it can keep contributing toward household demand without depending on a portable battery having room left to charge.
- Choose a battery-focused setup when storage or independently powered loads are the priority.
- Consider plug-in solar when the goal is to offset daytime household electricity use without buying a battery first.
Neither arrangement automatically makes every bit of available sunshine valuable. Battery capacity, household demand, and export compensation still matter.
A Related Project: Solar on My Garage Roof
I also installed Callsun 450-watt panels on my garage roof, feeding an EcoFlow battery system. That setup powers several things independently from the house.
There are six panels on that roof. Their combined nameplate rating is 2,700 watts, while the roughly 2,200-watt figure I discussed is a lower real-world output expectation, not the array’s rated capacity. I am also considering additional panels on the other side.
The mounting hardware made this project a lot easier. I used SnapNrack roof brackets, which cost about $16 apiece at the time.
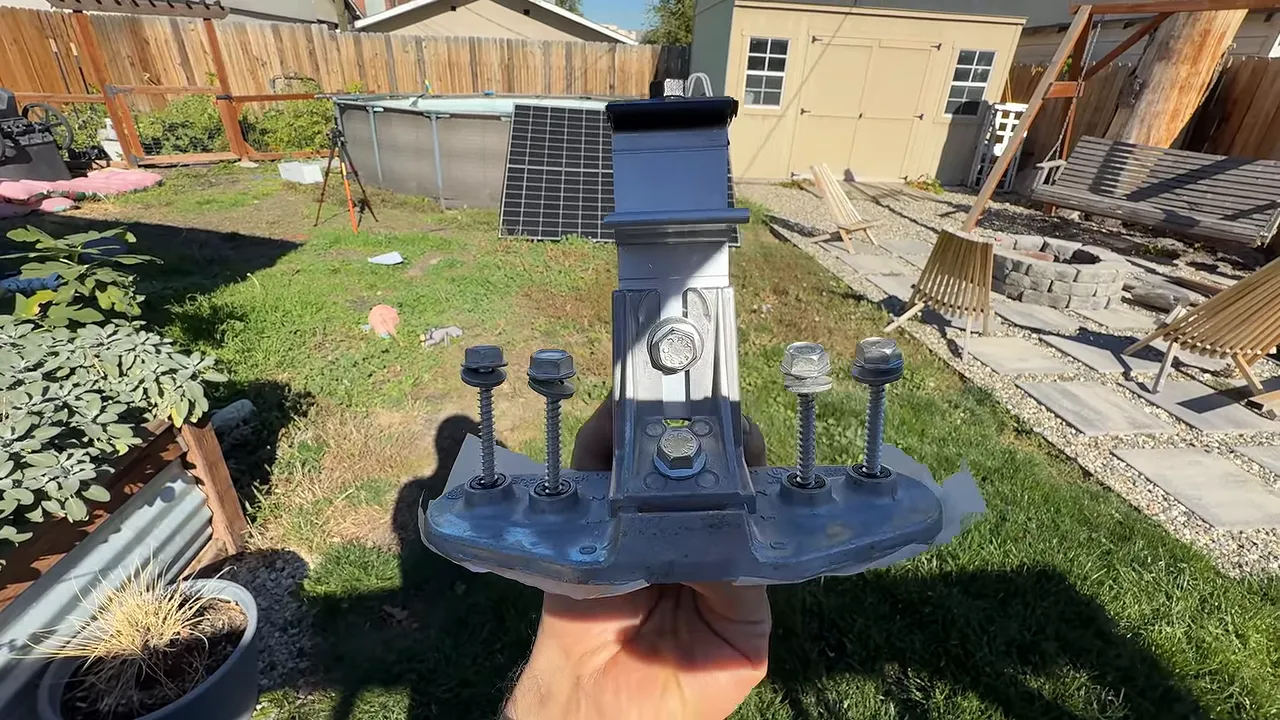
The brackets I used have aluminum construction, sealing material underneath the base, and adjustment that helps position the panels. The upper clamp uses a bolt with a half-inch head, and the system accommodates the panel edge and matching trim components.
The installed front trim gives the array a clean finish. I still need to add perimeter mesh to help keep critters from getting underneath.
These mounts can support a direct-to-deck installation where the manufacturer’s approved design allows it. That does not mean every roof can be treated the same way. Follow the mounting instructions for roof construction, attachment spacing, fasteners, sealing, and loading requirements rather than assuming you never need to locate framing.
Safety: Anti-Islanding and Equipment Certification
The most important inverter feature to understand is anti-islanding protection.
A grid-tied microinverter detects the utility supply. If grid power goes away, it must stop energizing the grid connection. That helps prevent solar equipment from feeding an electrical line that utility workers may expect to be de-energized.
This does not mean the inverter prevents all power export during normal operation. Export and dangerous outage backfeeding are different things. The critical protection is stopping grid-connected production when the utility supply is lost.
It also means this small grid-tied setup is not backup power by itself. Sunshine alone does not keep it supplying your house during an outage.
Before purchasing, verify the exact model’s safety certification and suitability for the intended installation. Look for certification to the applicable standards by a recognized testing laboratory.
A CSA mark and a UL mark are not interchangeable names. CSA can certify equipment to applicable U.S. standards, but you should verify the specific certification rather than treating a logo as blanket approval. OSHA’s recognized testing laboratory guidance provides useful context on these certification organizations.
Cost, Savings, and Payback
My rough equipment costs were:
- Two solar panels: about $600 total.
- Microinverter: about $250.
- Complete purchase: about $1,000 out the door.
Shopping around, I thought a comparable setup might be possible for roughly $800. Treat those as purchase-time figures, not guaranteed current pricing.
My initial estimate was approximately a two-year payback, with potential savings around $50 per month under my assumptions. Those are projections, not measured long-term results.
At a consistent $50 per month, $1,000 would be recovered in 20 months. But a sunny midday power reading cannot establish that monthly savings figure. Seasonal production, electricity prices, self-consumption, and export credits all affect the result.
A better way to evaluate your own project is:
- Estimate annual solar production in kilowatt-hours.
- Determine how much production will offset electricity you otherwise would buy.
- Value any exported energy using your actual utility terms.
- Compare the resulting annual savings with the complete installed cost.
The PVWatts solar calculator can help estimate production for your location and panel orientation. Pair that estimate with your utility bill rather than assuming my payback applies everywhere.
I also projected roughly $5,000 in savings over the years following payback within a ten-year ownership period. That is an illustration of the long-term potential, not a guaranteed return. The system needs to produce as expected, remain operational, and offset electricity at the assumed value.
A Small, Practical Way to Start With Solar
What I really like about plug-in solar is the scale. Two panels and a compact microinverter make it possible to explore useful solar generation without immediately taking on a large rooftop project or buying battery storage.
My setup produced roughly 718 watts when I checked it, cost about $1,000, and gives me app-based production monitoring. That is a pretty interesting entry point.
Just get the fundamentals right first: confirm local permission, use properly certified equipment, verify the connection requirements, and calculate savings using your own electricity rates. If those pieces line up, a small plug-in solar system is absolutely worth a closer look.


