The first cold night of the year is a lousy time to find out your furnace does not work. Unfortunately, that is exactly when a lot of homeowners discover a problem that could have been handled weeks earlier.
A little fall HVAC maintenance can help you avoid an emergency service call, protect expensive equipment, and get your home ready for heating season. But some things people do to protect their systems, like wrapping the outdoor unit in a cover, can actually create problems.
Here are five mistakes I want you to avoid before you switch from air conditioning to heat.
Table of Contents
- What You'll Learn
- 1. Covering Your Air Conditioner for Winter
- 2. Leaving Dirty Outdoor Coils and Debris Until Spring
- 3. Waiting Until the First Cold Night to Test Your Furnace
- 4. Overlooking a Dirty Flame Sensor
- 5. Assuming Your Smoke and Carbon Monoxide Alarms Are Ready
- Get Ahead of Heating Season While the Weather Is Mild
What You'll Learn
- Full outdoor-unit covers can trap moisture, shelter pests, and obstruct essential heat pump airflow.
- Gentle coil cleaning and debris removal prepare outdoor equipment for its next season of operation.
- Testing your furnace in mild weather gives you time to address startup and flame-sensing problems.
- Smoke and carbon monoxide alarms need testing, correct placement, and attention to their replacement dates.
1. Covering Your Air Conditioner for Winter
I understand the thinking here. Your HVAC system is one of the most expensive appliances you own. If you just paid for a new one, putting a cover over it probably feels like the responsible thing to do.
But outdoor air conditioners are designed to live outside. Normal rain, snow, sunshine, and cold weather are part of the job.
My recommendation is to skip the full winter cover. A cover that wraps around the top and sides can create two problems:
- A sheltered home for pests. Mice can nest inside the cabinet and chew wiring. Wrapping the unit gives them an even more protected place to settle in.
- Trapped moisture. An uncovered unit can dry as moisture evaporates. A full cover can hold moisture inside and contribute to premature corrosion.
A solid top cover creates a different risk
What about putting a board or solid cover over just the top?
I do not recommend that either. It is easy to forget it is there when warm weather returns. If the air conditioner starts with its discharge airflow blocked, the compressor can overheat and suffer serious damage.
If falling leaves are your concern, the only style of protection I recommend is a breathable top screen intended for that purpose. It keeps larger debris from falling through the fan opening without enclosing the sides or creating a solid barrier over the top. Make sure any accessory is compatible with your equipment and does not restrict airflow.
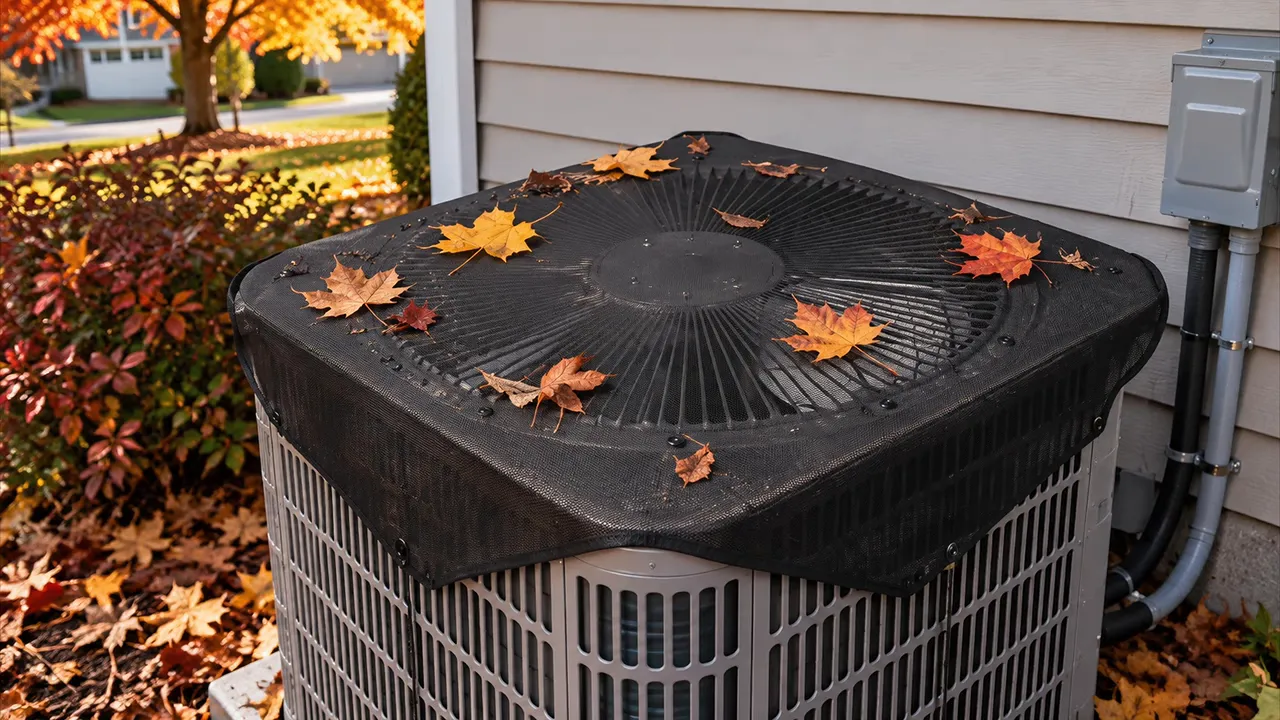
Never winter-wrap an operating heat pump
This distinction matters: an air conditioner and a heat pump may look similar, but a heat pump needs its outdoor unit during heating season.
A heat pump runs in summer for cooling and in winter for heating. Covering it because you think cooling season is over can restrict the airflow it needs to operate and cause expensive damage.
If you do not know which type of system you have, find out before making any seasonal shutdown decisions.
2. Leaving Dirty Outdoor Coils and Debris Until Spring
The second mistake is deciding that, because summer is over, the outdoor unit is somebody else's problem until spring.
After running all summer, the coils may be loaded with dirt. Weeds, shrubs, and fallen leaves may also be crowding the cabinet. Leave everything alone now, and it is easy to forget about it when the first hot day arrives.
For a heat pump, this is even more important. That outdoor coil is about to keep working through winter, so it needs clear airflow now.
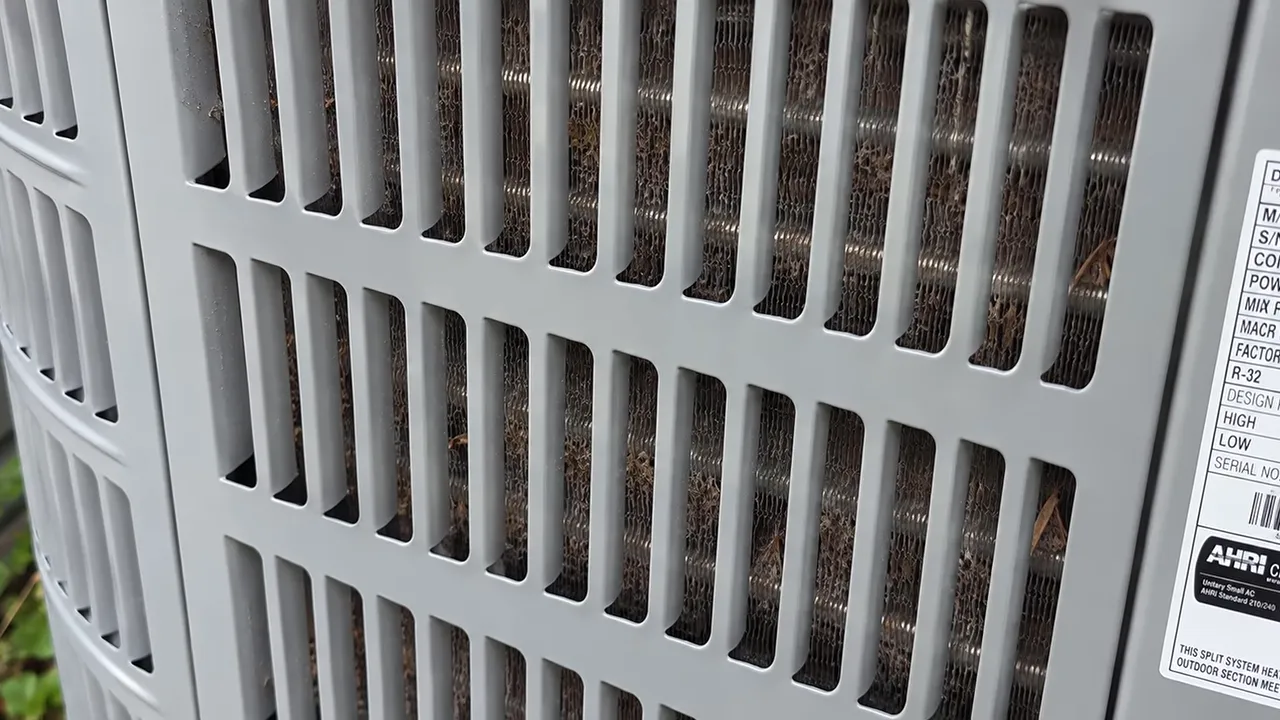
A basic fall outdoor-unit cleanup
- Turn the system off and isolate power. Follow the equipment instructions for the outdoor disconnect. Do not assume a thermostat setting alone makes the equipment safe to service.
- Clear the surrounding area. Remove leaves, weeds, and loose debris, and trim vegetation that interferes with airflow. Maintain the clearances specified by the manufacturer.
- Gently rinse the coil. For a basic cleanup, ordinary water from a garden hose may be all you need.
- Check for packed-in debris. Leaves can collect inside the bottom of the cabinet. A more thorough cleaning may be needed if the interior is loaded up.
The pullout disconnect shown on this system can be removed and reinserted in an OFF storage orientation. Not every disconnect works the same way, so follow the markings on yours. Keep the enclosure closed afterward, and remember that parts on the supply side can remain energized.
A deeper cleaning may involve removing the top assembly to reach the interior. That is a separate job from a simple exterior rinse. If you are not comfortable working around electrical components and fan wiring, have a qualified technician handle it.
Use a hose, not a pressure washer
Those thin metal fins are easy to bend. A pressure washer can flatten them quickly, especially on a unit with exposed coils. That defeats the whole purpose of cleaning because bent fins restrict airflow.
Use gentle water pressure. You do not need to blast the coil clean. If you choose to use a coil-cleaning product, make sure it is approved for that coil and follow its instructions.
The Department of Energy's air conditioner maintenance guidance provides additional context on keeping coils clean and outdoor airflow unobstructed.
Seasonal shutdown applies only to cooling-only equipment
For an air conditioner that will not be used during winter, take the thermostat out of cooling mode so it does not accidentally call for cooling during cold weather.
On suitable cooling-only systems, leaving the outdoor disconnect off can provide another safeguard against an accidental start. Follow your manufacturer's seasonal shutdown and restart instructions, including any requirements for restoring power before operation.
Do not apply that advice to a heat pump. Its outdoor unit needs power to provide heat during winter.
3. Waiting Until the First Cold Night to Test Your Furnace
When it is 65 degrees outside, the furnace is probably the last thing on your mind. Then the temperature drops, you turn up the thermostat, and nothing happens.
Now a maintenance problem has become a no-heat emergency.
I always recommend testing the furnace while the weather is still mild. If something is wrong, you have time to arrange service before you desperately need the heat.
- Set the thermostat to heating mode.
- Raise the setpoint a few degrees above the current indoor temperature.
- Allow the furnace to complete its startup sequence.
- Confirm that warm air eventually comes from the supply vents and the system continues operating normally.
What happens during a typical gas furnace startup?
Understanding the basic sequence helps you describe a problem if the furnace does not start. On the gas furnace demonstrated here, the sequence is:
- The inducer starts. This establishes draft through the combustion and venting system.
- The pressure switch proves draft. Once the required pressure condition is detected, the control can proceed.
- The ignition source activates. A hot surface igniter glows, or a spark ignition system produces a spark, depending on the furnace.
- The burners ignite. The gas valve opens at the appropriate point in the sequence.
- The flame sensor confirms flame. The control must prove flame to keep the gas flowing.
- The circulating blower delivers heat. After the appropriate delay, warm air moves through the ductwork.
Exact timing and components vary by model. Observe only through the intended inspection openings with required panels in place. Do not bypass a door switch or other safety control to make the furnace run.
A faint, brief dusty smell can happen during the first heating cycle as accumulated dust warms up. That smell always reminds me that fall is here. But do not confuse it with a persistent burning odor, smoke, or a gas smell. Those are reasons to stop and get help, not simply let the furnace keep running.
4. Overlooking a Dirty Flame Sensor
Does the furnace light, shut the burners off shortly afterward, and then try again?
A dirty flame sensor is one common cause of that pattern. It is not the only possibility, but it is a small component that has generated a whole lot of service calls over my career.
The sensor lets the furnace control verify that a flame is present. Deposits on the sensing rod can interfere with that signal. If the control cannot prove flame, it shuts off the gas as a safety measure.
Identify the sensor before removing anything
Do not mistake the flame sensor for the igniter. On the furnace shown here, the flame sensor is a metal rod supported by a white ceramic insulator, with one wire attached. The hot surface igniter has two wires.
That is a useful clue, not a replacement for the furnace's service information. Component layouts vary, and igniters can be fragile.
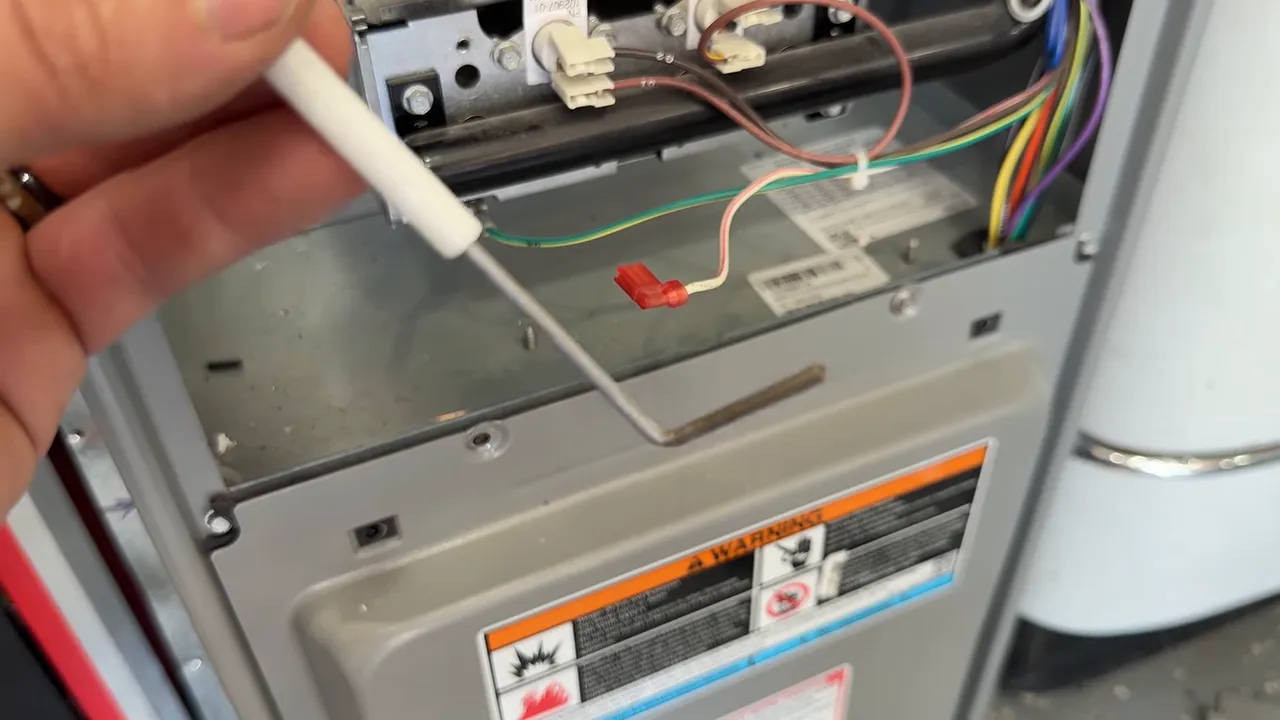
How to clean an accessible flame sensor
Only do this if your equipment instructions permit it and you can safely identify and access the part. Turn off electrical power to the furnace and let hot components cool before beginning. Follow any additional shutdown steps in the service instructions.
- Disconnect the sensor wire carefully. Remove the connector without pulling on the wire itself.
- Remove the retaining screw. A 1/4-inch or 5/16-inch nut driver is commonly needed.
- Slide the sensor out. A bent rod may need a gentle twist to clear the opening. Do not bend it or damage the ceramic.
- Clean the metal rod gently. Remove surface deposits using the method approved by the furnace manufacturer. Avoid aggressive sanding or removing metal.
- Reinstall it in its original position. Seat the mounting bracket properly and tighten the screw snugly without stripping it.
- Reconnect the wire and restore the furnace. Reinstall required panels, restore power, and test a heating cycle.
You may find a white, crusty coating on the rod. The demonstration uses a light abrasive pad to remove deposits, but cleaning recommendations differ, so the manufacturer's procedure takes priority.
The mounting connection matters, too. Flame sensing depends on a very small electrical signal through the flame and the furnace grounding path. A loose mounting screw or poor connection can leave you with trouble even after the rod is clean.
For accessible fasteners, I like a magnetic multi-bit nut driver. The Klein tool I use stores several bit types in the handle, and its removable shaft can also work with a drill. For this little screw, though, using the hand driver gives better control and helps prevent stripped threads. It is included among my favorite HVAC tools.
If the burners still shut off after cleaning, do not keep assuming the sensor is the problem. Have the furnace diagnosed. Never bypass flame-proving or other safety controls.
5. Assuming Your Smoke and Carbon Monoxide Alarms Are Ready
This last check is about more than avoiding a repair bill. Before heating season, make sure your smoke and carbon monoxide alarms are installed correctly, within their service life, and functioning according to their instructions.
A carbon monoxide alarm is not necessarily going to sound the instant any CO reaches it. Alarm response depends on both the concentration and how long that concentration is present.
Why a digital CO display can be useful
To illustrate how alarm timing changes with concentration, common UL 2034 response windows include:
- 70 parts per million: Alarm response within 60 to 240 minutes.
- 150 parts per million: Alarm response within 10 to 50 minutes.
- 400 parts per million: Alarm response within 4 to 15 minutes.
These are alarm response windows, not safe exposure limits or permission to remain in a home with a suspected CO problem.
A digital display can provide useful information about detected CO before an audible alarm threshold is reached, depending on the model's display limits. For example, a reading below the alarm threshold may still point to a problem that needs investigation. It does not, by itself, identify the source or prove that a heat exchanger is leaking.
If a CO alarm sounds or you suspect carbon monoxide exposure, get everyone outside to fresh air and call emergency services. Do not stay inside trying to troubleshoot the furnace. The CPSC's carbon monoxide safety guidance is a useful reference for household precautions.
Check batteries, service life, and placement
Make fall your reminder to review every alarm:
- Test it using the manufacturer's procedure and continue testing at the specified intervals.
- Replace user-replaceable batteries on the recommended schedule.
- Check the replacement date and any end-of-life indication.
- Follow the exact mounting and location instructions for that model.
Some alarms use sealed batteries rated for a 10-year service life. Those do not need an annual battery swap, but they still need testing and replacement when required. A long-life battery is not a guarantee that the entire alarm needs no attention.
Also, do not assume a CO alarm belongs near the floor because carbon monoxide supposedly settles there. That is a misconception. Combination smoke and CO alarms may be intended for ceiling or high-wall mounting. Use the instructions for your specific alarm rather than a one-size-fits-all placement rule.
Features I like in the X-Sense lineup
I like the digital readout on the X-Sense combination smoke and CO alarm discussed here. Depending on the model and system, the lineup also offers interconnected alarms, app connectivity, and remote phone alerts. Compatible water-detection devices are available as well.
Check the exact model before buying. Interconnection, Wi-Fi access, battery type, and display behavior are features to verify, not things to assume every alarm from the brand includes.
Get Ahead of Heating Season While the Weather Is Mild
You do not need to wait for freezing temperatures to find out whether your heating system is ready. Leave the outdoor unit free to breathe, clean up the coil and surrounding debris, test the furnace early, address flame-sensing trouble correctly, and verify your smoke and CO alarms.
Once those basics are handled, emergency furnace power is another winter-preparedness topic worth considering. It is a separate project that needs a safe, equipment-appropriate setup, not improvised wiring.
The goal is simple: find the small problems while you still have time to deal with them. A little attention now is a whole lot better than a cold house and an emergency service call later. Be safe.


