When it is 91°F outside and the air conditioner keeps running, anything that promises a lower electric bill gets my attention. But I want to see measurements, not just a claim on a box.
I installed a Cool-N-Save AC misting system on my outdoor condenser and checked three things before and after: noise, compressor amp draw, and air temperature at an indoor register.
The results were encouraging. Compressor current dropped from 4.4 amps to 3.6 amps, and the supply air got a little colder. Does that prove a 30% reduction in the electric bill? No. Here is what I installed, how the test worked, and what those numbers actually tell us.
Key Takeaways
- Measured compressor current dropped from 4.4 to 3.6 amps with the misting system operating.
- Supply-air temperature decreased by 0.7°F, while condenser noise stayed about the same.
- The short test did not verify a 30% reduction in electricity bills.
- Installation planning should account for paddle airflow, spray direction, and water-treatment maintenance.
What Does the Cool-N-Save System Do?
Cool-N-Save adds a fine water mist around the outdoor air conditioner. The idea is to cool the air entering the condenser so the system can reject heat more easily.
The clever part is the paddle mounted above the condenser fan. When the AC starts, the fan’s upward airflow lifts the paddle and activates the water supply. That ties misting to the outdoor fan’s operation without having to wire the device into the air conditioner.
My kit included:
- A 20-foot water supply tube with a hose-bib connection.
- Three branch tubes to position around the condenser.
- Misting nozzles and fittings.
- An inline water-treatment cartridge intended to help control mineral buildup.
- The adhesive-mounted paddle and water-control assembly.
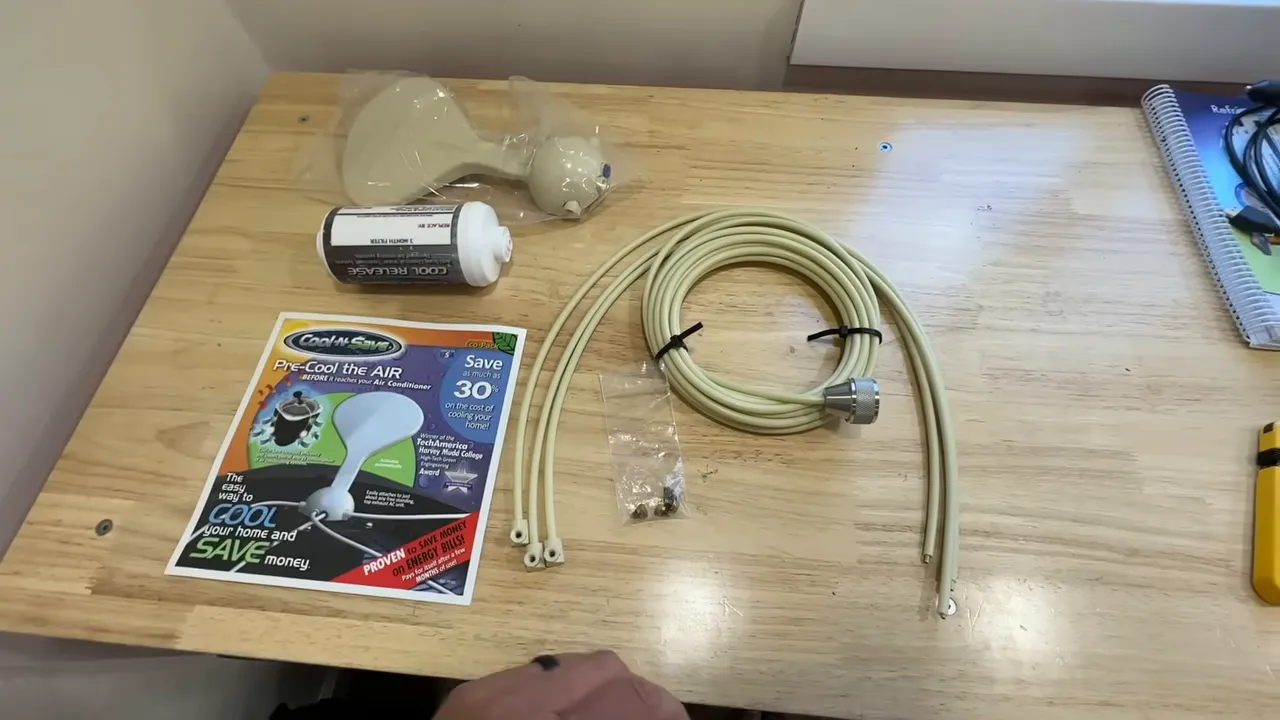
The supplied main tube should reach a nearby outdoor faucet if the routing distance is within 20 feet. Measure the actual path, including the distance up to the control assembly, rather than just the straight-line distance across the ground.
Getting the Before Measurements
Before adding the mister, I let the air conditioner run for at least 10 minutes. I set the thermostat to about 67°F to keep it calling for cooling during the test, not because that is a recommended everyday setting.
With the outdoor temperature at about 91°F, I recorded these starting measurements:
- Sound: Approximately 63 decibels from about four feet away.
- Supply-air temperature: About 53°F, later referenced more precisely as 53.2°F, after the thermometer sat at the register for about five minutes.
- Compressor current: 4.4 amps at the conductor I selected using the unit’s wiring diagram.
A note about tools and electrical safety
For the access-panel screws, I used a Klein multi-size nut driver with six sizes and a removable shaft assembly. The compact shaft helps in tight spaces, and it can also fit a drill. I prefer hand tightening these sheet-metal screws because it gives better control and reduces the chance of stripping them.
That driver is among my favorite HVAC tools.
For the current measurement, I used the schematic on the back of the access panel to identify the compressor’s R terminal and trace its conductor. On my unit, that wire was red. Do not assume another air conditioner uses the same wire color.
Measuring current inside an operating condenser exposes live electrical components. That is not a necessary part of installing this water kit, and it is a job to leave to a qualified HVAC technician if you are not trained for it. Shut off and verify power before installation work, and remember that capacitors can retain a dangerous charge.
How I Installed the AC Misting Kit
The water-kit installation took me about 10 to 15 minutes. Most of the work was planning the layout, cutting tubing, and pushing it into fittings.
1. Shut off power and plan the orientation
I shut off power at the outdoor disconnect before mounting anything on the condenser.
Before committing to the adhesive location, think through both the paddle position and where the three misting lines will hang. Some condenser fans have uneven discharge airflow, so the paddle needs a location where the airflow can reliably lift it.
My fan had good airflow around the top, but there was another placement issue I would change: one nozzle ended up spraying toward the foundation. Planning the entire layout first would have avoided that.
2. Clean the mounting surface and attach the control
The control assembly has an adhesive pad underneath. I cleaned the mounting area on top of the unit, oriented the paddle over the fan grille, and attached the assembly.
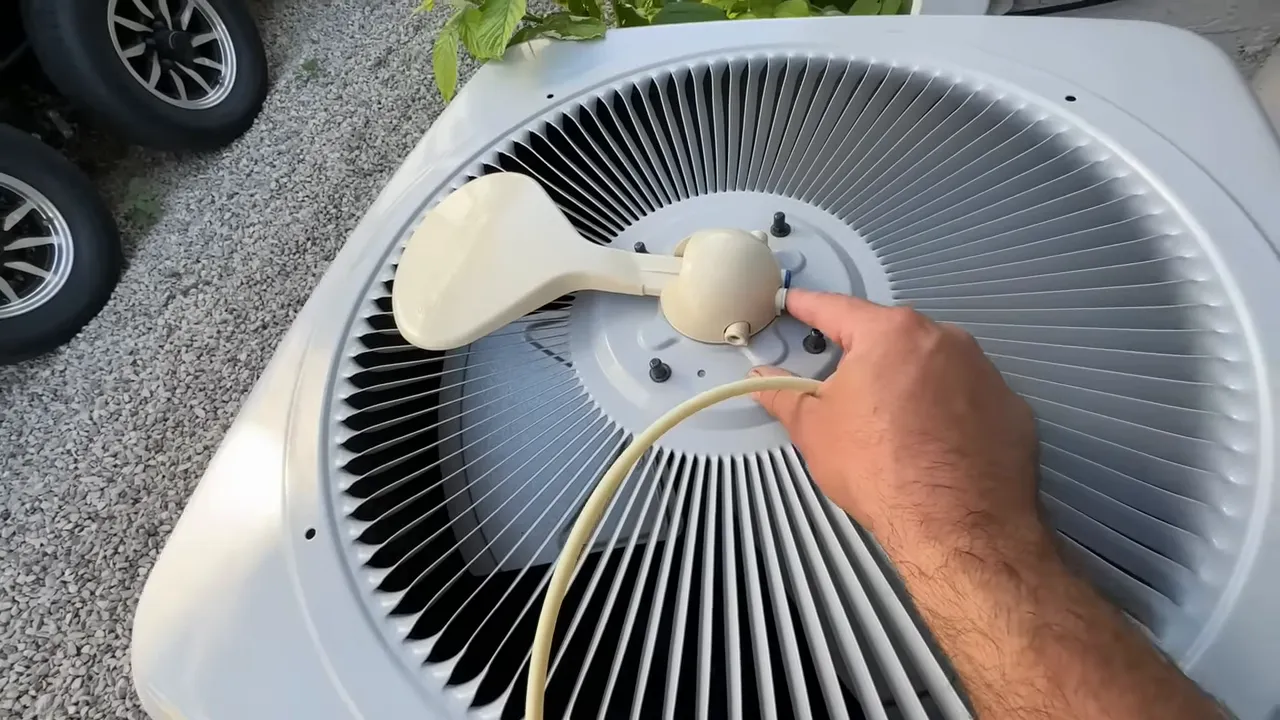
3. Connect the outdoor water supply
I connected the main supply tube to the hose bib next to my condenser. For a permanent setup, I would consider a hose splitter so I could keep using a regular garden hose without disconnecting the mister.
Keep the tubing route tidy and away from areas where it could get pulled, pinched, or damaged.
4. Install the inline cartridge
To add the water-treatment cartridge, I cut the main supply tube at a suitable location and pushed the two cut ends into the cartridge’s quick-connect fittings.
The cartridge was marked for three months. Water hardness matters, so that is a maintenance item to pay attention to rather than something to install and forget. Its purpose is to help limit calcium and mineral deposits, not to establish that buildup can never occur.
I described the system’s daily water use during summer operation as roughly comparable to one toilet flush. However, I did not meter water consumption during this test, so treat that as an estimate, not a measured result or a fixed daily allowance.
5. Connect the main inlet and three misting lines
I routed the main supply tube to the blue port marked IN on the control assembly. The other three ports feed the branch tubes around the condenser.
For each branch, I measured enough tubing to put the nozzle approximately halfway down the side of the unit, cut it to length, and pushed it into its fitting.
The branch tubing had an internal wire. I could cut it to the required length, but I did not establish the wire’s purpose, so I would not credit it with preventing mineral buildup.
6. Secure the tubing and test operation
I added zip ties to hold the branch tubes straight against the protective grille. Those zip ties were not included with my kit, but they helped keep the nozzles pointed consistently.
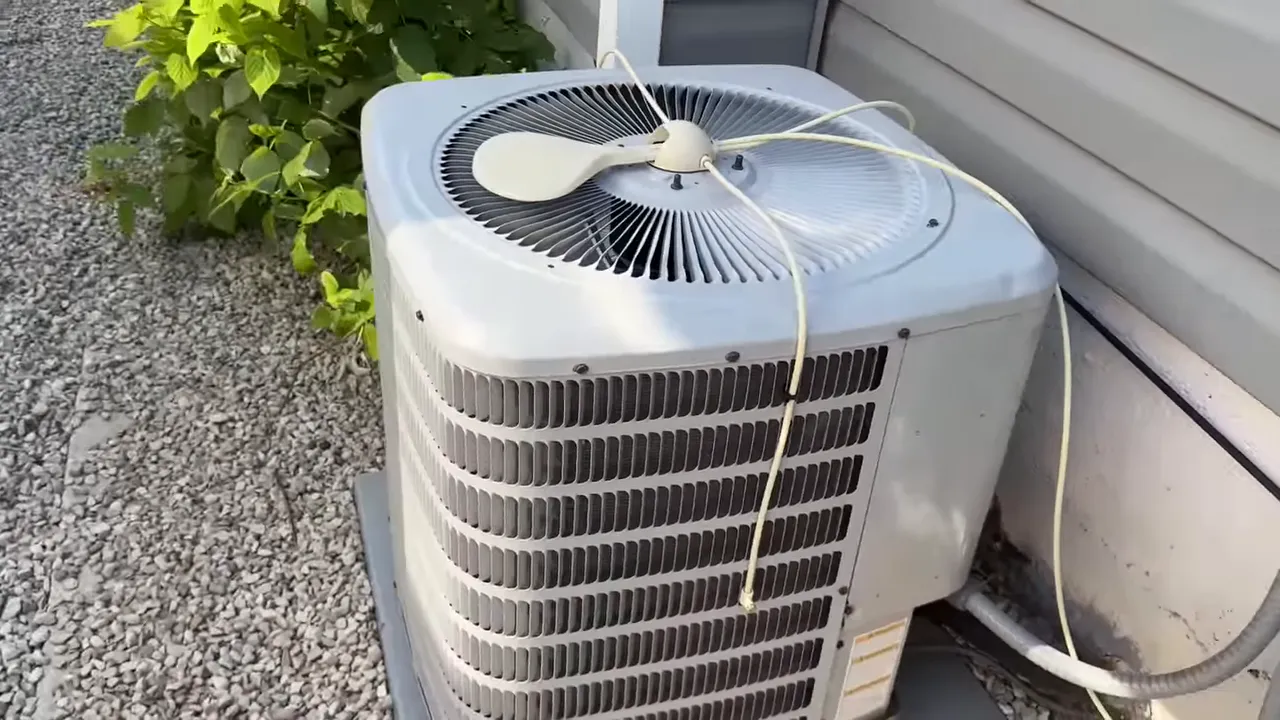
With the installation complete, I turned on the water and restored power. When the condenser fan started, the paddle lifted and the misting system began operating.
I then let the air conditioner run for about 15 minutes before repeating the measurements.
The Results: Lower Amps, Slightly Colder Air
Noise stayed about the same
The sound readings remained in roughly the same range. I did not find a meaningful noise reduction, so I would not buy this device expecting a quieter condenser.
Compressor current dropped from 4.4 to 3.6 amps
This was the most interesting result. With the misting system operating, the measured compressor current fell by 0.8 amp.
Relative to the starting reading, that is about an 18% reduction in measured current. That is a noticeable change in this short test.
However, compressor amps are not the same thing as whole-system electrical energy use. I did not measure total system watts, accumulated kilowatt-hours, or cooling runtime over comparable days. I also did not compare monthly electric bills.
This test showed lower compressor current under the conditions tested. It did not verify a 30% electric-bill reduction.
Supply air dropped from about 53.2°F to 52.5°F
At the indoor register, the follow-up temperature was 52.5°F compared with the earlier 53.2°F reading. That is a 0.7°F decrease, or a little less than one degree.
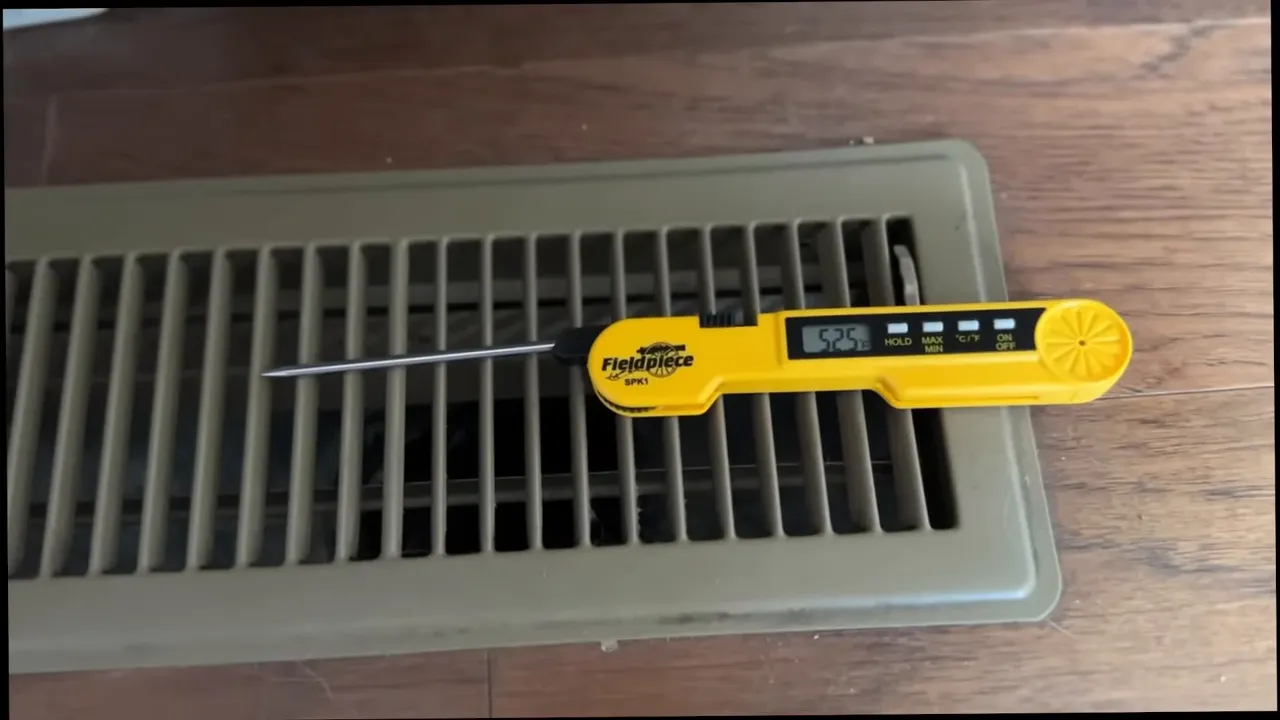
I was happy to see the air temperature move in that direction, but it was a small change. A short before-and-after check cannot establish how much of that difference would repeat across different weather conditions and operating cycles.
What I Would Pay Attention to Before Buying
I came away impressed with how quickly the kit went on and with the lower current reading. Still, a few practical details deserve attention.
- Water quality: Keep up with the treatment cartridge and inspect for mineral deposits, especially with hard water.
- Paddle airflow: Find a mounting position where the condenser fan can lift the paddle reliably.
- Spray direction: Avoid a layout that continually sprays the foundation or other unintended surfaces.
- Water access: Confirm the supplied tubing reaches your faucet along a practical route.
- Ongoing costs: Water and replacement cartridges belong in any savings calculation.
My condenser only gets a limited window of direct sunlight, roughly around 11 a.m. to noon. I suspected a unit exposed to stronger afternoon sun might benefit more, but I did not test a second location. That remains an expectation, not a measured comparison.
Also, an accessory is not a substitute for basic AC upkeep. For additional maintenance guidance, the U.S. Department of Energy has a useful resource on maintaining your air conditioner.
My Bottom Line on Cool-N-Save
For a simple installation, this system produced an encouraging result on my air conditioner: lower measured compressor current, slightly colder supply air, and essentially unchanged noise.
I would have considered leaving it installed, but this condenser was already scheduled for replacement with a hyper-heat heat pump while retaining the furnace. That means this was a short-term test, not a full-season evaluation of savings, maintenance, or mineral buildup.
Would I call it a proven way to cut the electric bill by 30%? No. Would I call the drop from 4.4 to 3.6 amps worth investigating? Absolutely. Just keep the measured results separate from the bigger savings promise, and plan the installation carefully.
If you want to look into the same kit I tested, you can find the Cool-N-Save system below.


