A simple shade, a PVC frame, and a few minutes of assembly gave us an interesting result: supply air that measured 9°F cooler after installation, along with a modest reduction in compressor current.
That got my attention. Last year, I installed an AC Shade at my neighbor’s house and reported a roughly 10°F improvement. This time, I wanted to do more than check a temperature. I took before-and-after readings at the indoor supply vent and outdoor condenser, and checked compressor amperage on both runs.
The shade took less than five minutes to assemble. The testing took longer, including about 20 minutes of operation for each run. Here’s how the installation went, what we measured, and what those numbers tell us.
Key Takeaways
- Air conditioners cool indoor air by absorbing heat inside and releasing it outdoors.
- The shade assembled in under five minutes, while each cooling test ran for about 20 minutes.
- Supply air measured 9°F cooler, and black-lead compressor current dropped approximately 0.4 to 0.5 amps.
- This field comparison recorded short-term changes, not guaranteed performance improvements or measured electricity-bill savings.
Table of Contents
- Your Air Conditioner Removes Heat Instead of Making Cold
- What Comes in the AC Shade Box?
- How I Assembled and Installed the Shade
- Setting Up the Before-and-After Test
- The Results With the AC Shade Installed
- What I Take Away From This Test
Your Air Conditioner Removes Heat Instead of Making Cold
This can take a second to wrap your brain around: your air conditioner does not create a substance or energy called “cold.” It makes the house cooler by moving heat out of it.
Inside the home, air passes across the evaporator coil. Refrigerant absorbs heat at that coil and carries it through the refrigeration system. Outside, the condenser releases heat into the outdoor air.
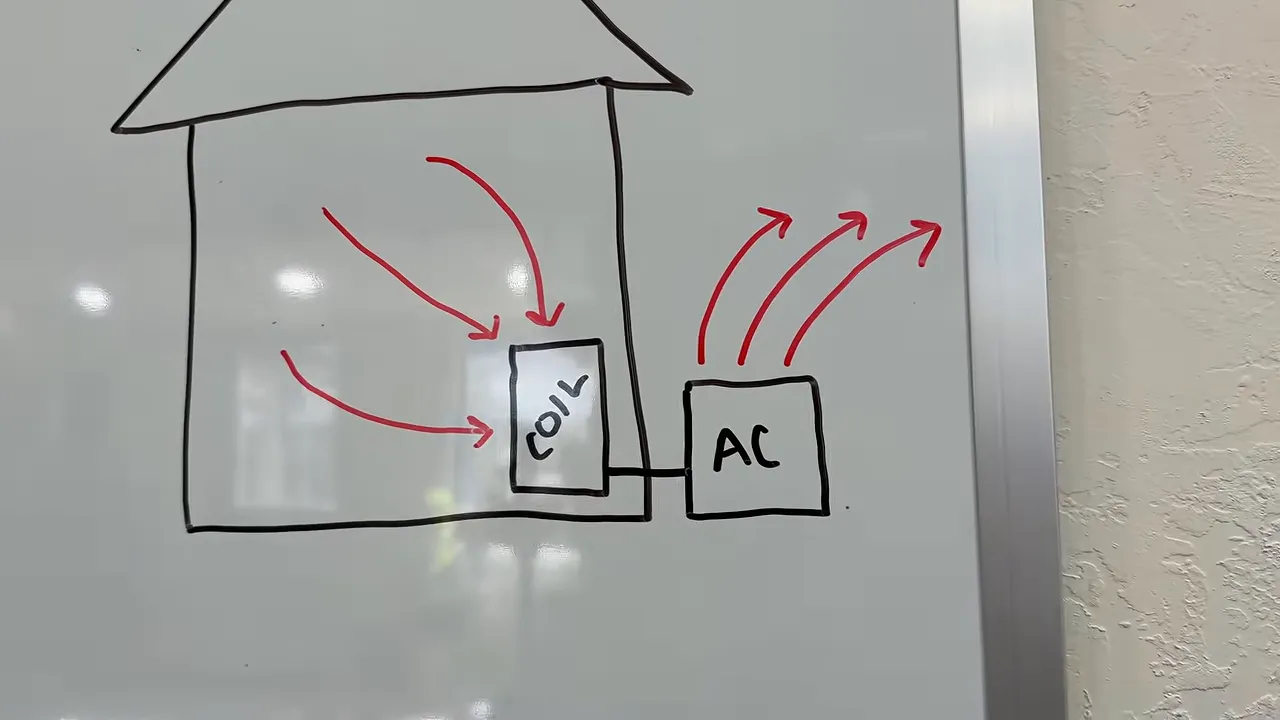
That’s why the air blowing out of the top of a working outdoor condenser feels warm. Even on a very hot day, the discharge air can be hotter than the surrounding outdoor air because the system is rejecting heat.
If you want a little more background on that process, the U.S. Department of Energy explains it in its guide to central air conditioning.
Where an AC shade fits into that process
The idea behind shading the outdoor unit is straightforward: reduce its exposure to direct sunlight while allowing it to keep moving air and releasing heat.
But those two goals have to go together. Shade should not come at the expense of condenser airflow. A solid cover over the fan or an enclosure tight against the coil is not the same thing as the open-center shade used here. Follow the equipment manufacturer’s clearance requirements and the shade’s installation instructions.
Our test unit sat in direct sunlight on a concrete pad beside the house, making it a useful location for a before-and-after comparison.
What Comes in the AC Shade Box?
The kit was pretty basic, which is a good thing for a quick installation. Inside were:
- Mesh shade fabric.
- PVC frame sections.
- Connecting fittings.
- Installation instructions.
- A QR code for warranty registration.
The fabric is noticeably porous. I could see my hand through it, but it still cast a clear shadow on the concrete. The intent is to provide shade while letting air pass through the material.
Wind was a common concern after my earlier installation. In that experience, the mesh allowed wind through rather than behaving like a solid sheet. That said, the fabric’s porosity does not replace securing the assembly properly.
How I Assembled and Installed the Shade
I put the frame together on the concrete before placing it on the condenser. Having everything laid out made the assembly easy to follow.
- Spread the fabric upside down. This exposes the pockets that hold the PVC sections.
- Lay out the pipes and fittings. Position the pieces where they belong before connecting them, including the longer sections for the center frame.
- Connect the center section. Assemble the rectangular opening that will sit around the condenser’s top fan area.
- Fit the remaining sections into the fabric pockets. Connect the outer supports and stretch the fabric into position.
- Check the completed frame. Some tension in the fabric is intentional.
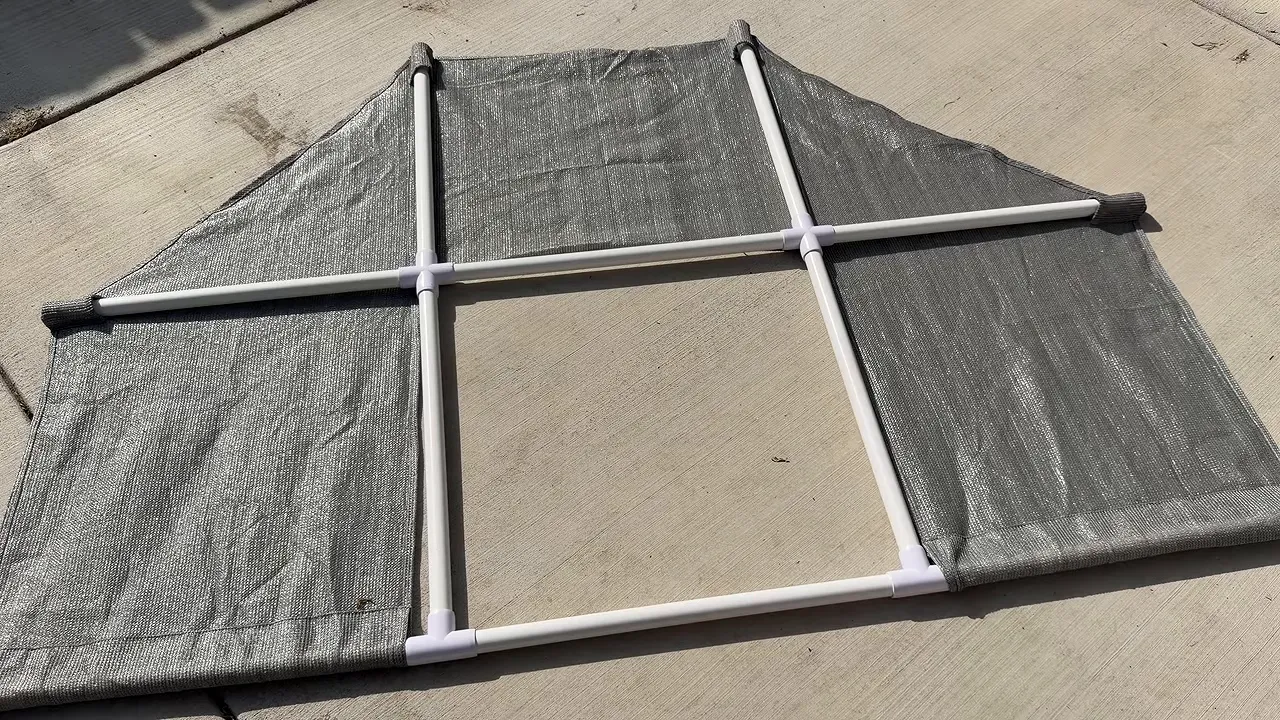
I did not glue the PVC connections for this installation. Gluing was presented as an option, but it was not needed for the assembly shown here.
From laying out the pieces to having the shade ready to place on the unit, assembly took less than five minutes.
Test-fit it before securing it
With the frame assembled, I placed it over the condenser and checked the fit. The center opening left the top fan discharge exposed, while the fabric extended outward to shade the sides.
One section needed trimming to fit beside the house. That adjustment let the shade sit in place without giving up the coverage we wanted. Any fit adjustment should stay within the product’s instructions.
Finally, I secured the assembly with bungees attached to metal points on the condenser cage. The finished setup left the coil sides open beneath the shade and the fan outlet open above.
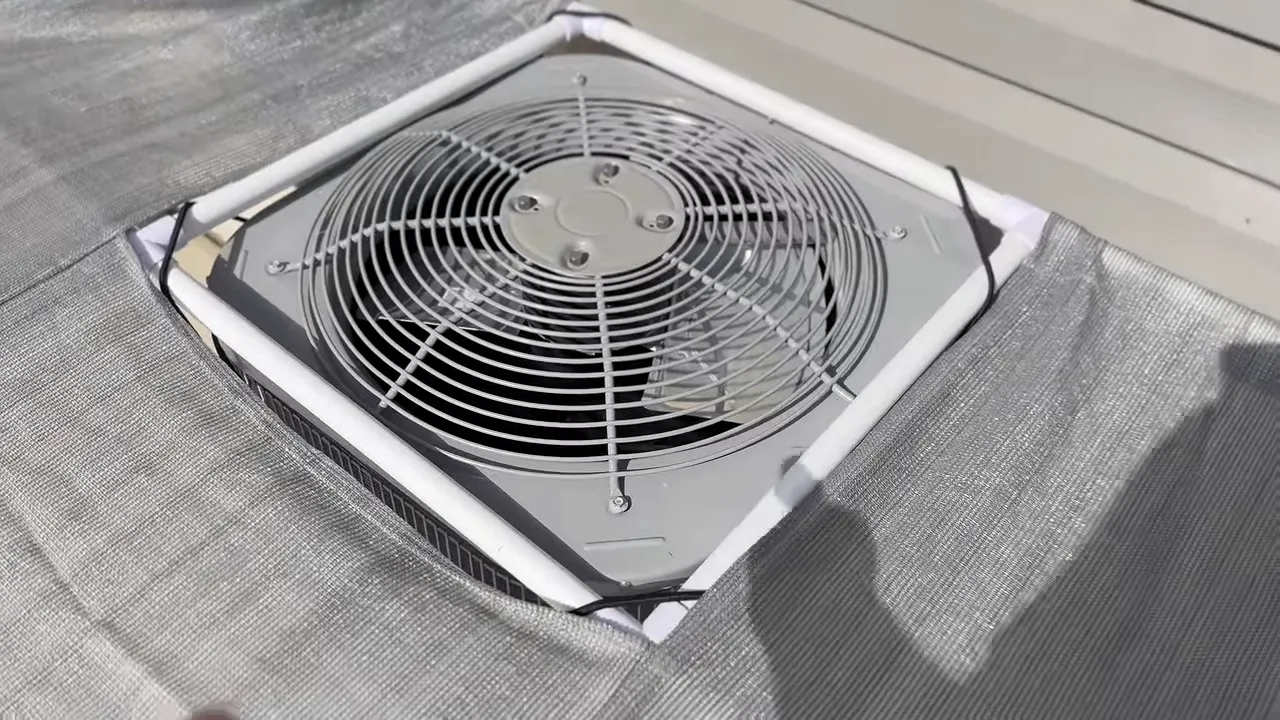
After confirming the fit, I removed the shade so we could establish an unshaded baseline first.
Setting Up the Before-and-After Test
I wanted the two runs to be as comparable as practical. Once the day warmed up to about 92°F outdoors, I started the baseline test without the shade.
The ecobee thermostat showed an indoor temperature of 73°F. I let the air conditioner run for approximately 20 minutes before recording the baseline temperatures.
The measurements were:
- Indoor supply-vent air temperature.
- Air temperature leaving the top of the outdoor condenser.
- Current on the black compressor lead from the contactor.
- Current on the blue lead connected to the capacitor.
Safety note: Checking current inside an operating condenser involves exposed electrical components. Those readings are part of the test, not a recommendation to open an energized electrical compartment. Leave live electrical measurements to someone qualified to perform them safely.
Baseline readings without the shade
After about 20 minutes of cooling, the supply vent measured approximately 56°F.
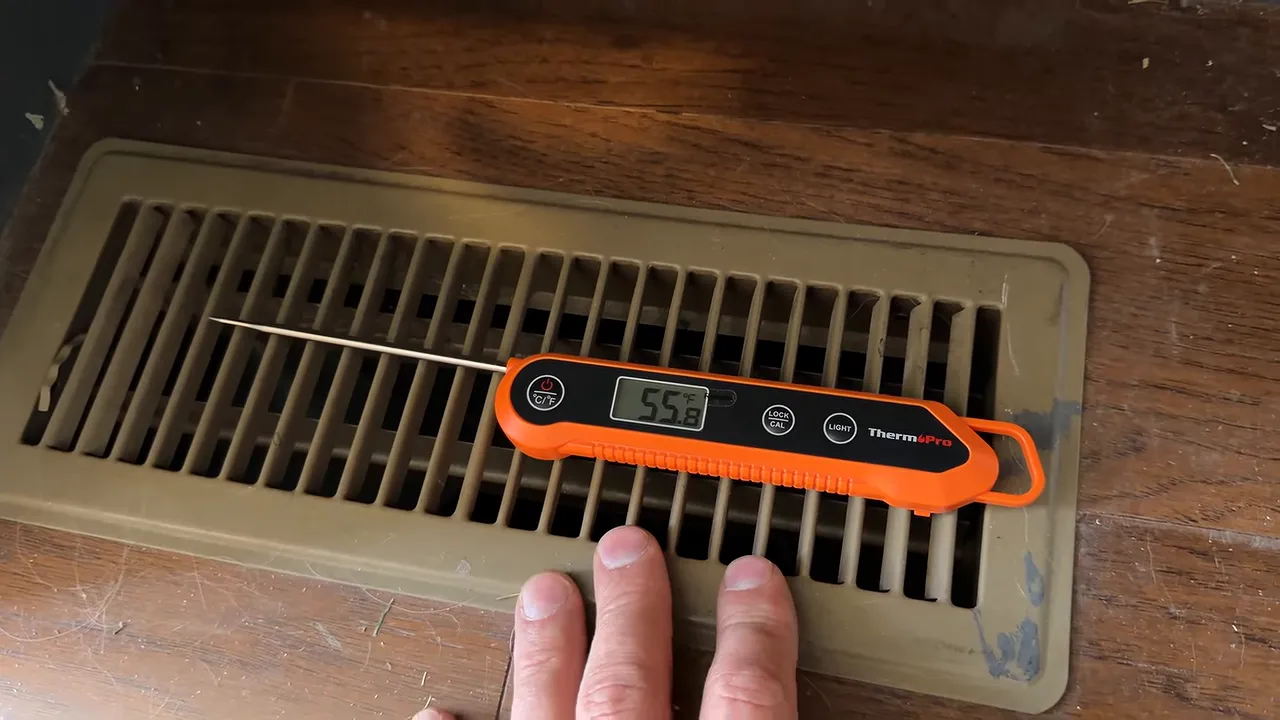
Using the thermostat’s 73°F indoor reading as a reference, that gives a temperature difference of approximately 17°F: 73 minus 56.
You’ll often hear this difference called delta T. Strictly speaking, return-to-supply delta T uses measured return-air temperature, not just the thermostat reading. I discussed roughly 17°F to 20°F as a reference range during the test, but a temperature split alone is not a complete system diagnosis.
Outside, the baseline readings were:
- Condenser discharge air: approximately 102°F.
- Black compressor lead: approximately 4.6 to 4.7 amps.
- Blue capacitor-connected lead: approximately 3.5 to 3.6 amps.
The first current reading earlier in the run had settled near 3.4 amps. Because the two leads produced different readings, I recorded both and compared each one with the same lead afterward.
Next, I shut the system off, let it sit for about 20 minutes, installed the shade, and repeated the approximately 20-minute cooling run.
The Results With the AC Shade Installed
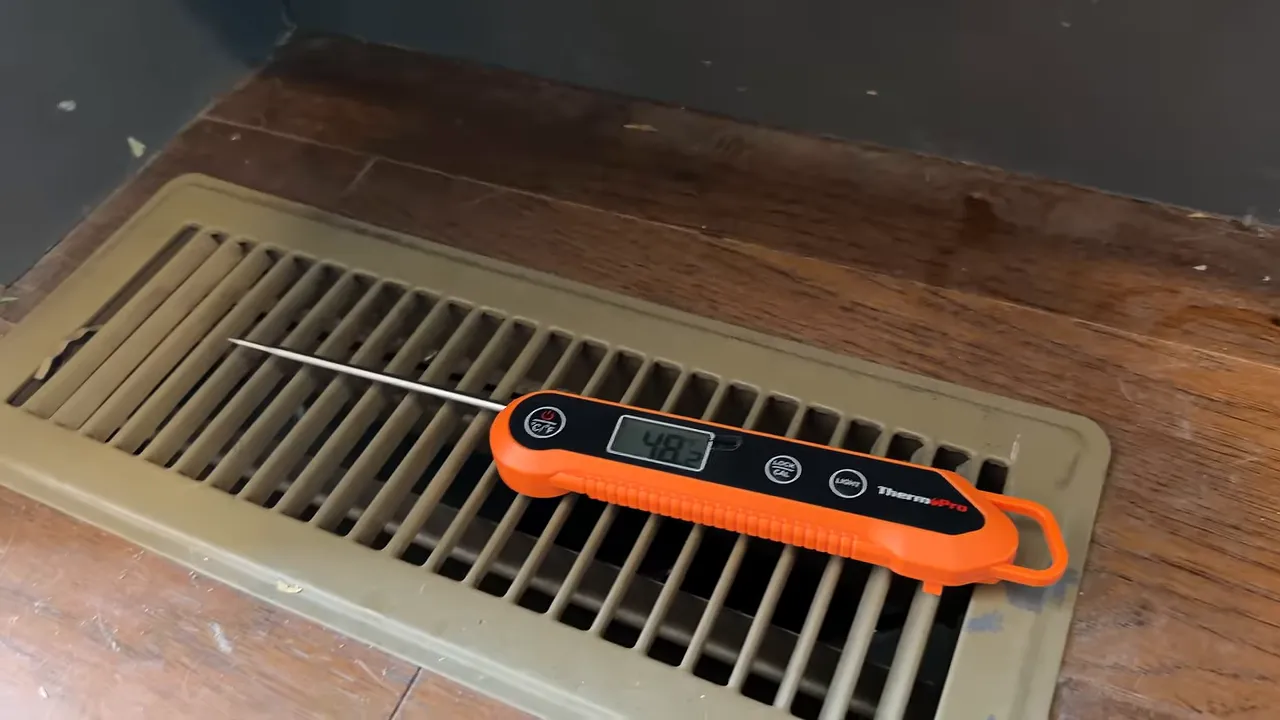
Supply air dropped from 56°F to 47°F
This was the result that stood out: the supply vent measured approximately 47°F during the shaded test, compared with approximately 56°F during the baseline.
That’s a 9°F reduction in measured supply-air temperature. For something this simple to assemble, I was excited to see that difference.
Current dropped on the black compressor lead
The black lead measured approximately 4.2 amps with the shade installed. Compared with the earlier 4.6 to 4.7 amps, that was a reduction of roughly 0.4 to 0.5 amps.
The blue lead measured about 3.4 amps, only slightly below its baseline reading.
That is a modest change, not a night-and-day difference. Lower current is encouraging, but this short test did not measure total electrical energy use or establish a dollar amount of savings on an electricity bill.
Outdoor discharge air measured slightly warmer
The air leaving the top of the condenser measured approximately 103.6°F, with a reading around 104°F observed as well. That was roughly 1.6°F to 2°F above the 102°F baseline.
I initially interpreted that as more heat being released. It is worth keeping the distinction clear, though: discharge temperature by itself does not quantify heat rejection. These readings belong alongside the supply-temperature and current measurements, rather than serving as proof on their own.
The shaded concrete was cooler, too
While there was still direct sunlight, I also compared shaded and unshaded concrete with an infrared thermometer. The shaded area measured roughly 10°F cooler.
That showed a clear surface-temperature difference under the shade. It was not a direct measurement of condenser-coil temperature, so I would not treat those as interchangeable.
What I Take Away From This Test
On this installation, we recorded cooler supply air and lower current on the black compressor lead after adding the AC Shade. Those are useful observations, and they were consistent with the direction of the results I had reported at my neighbor’s house.
Still, this was a practical field comparison, not a laboratory test. Matching the run times helped, but it did not hold every condition constant. A storm moved in just after we finished, and direct sun exposure disappeared.
The 9°F result is what we measured here, not a guaranteed improvement for every air conditioner. The test also does not establish seasonal energy savings or prove that the shade alone caused the full temperature change.
The installation itself was simple, and the open-center design was the important detail for me: shade the unit without putting fabric over its discharge fan. If you’re considering one, check compatibility, fit, attachment points, and your condenser’s airflow requirements first.
You may also notice misting tubing around this condenser. That is a separate system I designed and discussed separately. This comparison focused on the shade, not on demonstrating or evaluating the misting system.
If the AC Shade looks like a fit for your setup, you can find the product through the link below. Be safe, and keep that condenser airflow clear.


