An air conditioner that freezes up does not automatically need refrigerant. Before you hook up a cylinder, you need to know whether you have an airflow problem, dirty coils, or an actual low charge. Otherwise, you can turn a fairly simple service issue into an overcharged system.
On this system, we cleaned the outdoor coil, replaced a restrictive air filter, and checked the refrigerant readings again. Only after those checks did we make a small charge adjustment, bringing subcooling from roughly 6.5°F to about 11°F.
The charging itself was straightforward. Getting the diagnosis right, handling refrigerant safely, and removing the gauges properly are the parts you do not want to skip.
Table of Contents
- Key Takeaways
- Before You Handle Refrigerant: Certification and Safety
- Check These Three Things Before Assuming Your AC Is Low
- Why I Like Digital Gauges for Checking AC Charge
- Preparing the Refrigerant and Charging Hoses
- Making the Charge Adjustment in Small Increments
- Removing the Gauges Without Wasting the Hose Charge
- The Real Skill Is Knowing Whether Refrigerant Is Needed
Key Takeaways
- Check coil cleanliness and indoor airflow before deciding a freezing air conditioner needs refrigerant.
- Use the manufacturer's charging method and target, not a universal pressure or subcooling number.
- Add refrigerant in controlled increments and allow readings to stabilize between adjustments.
- Appropriate certification and careful hose-charge handling are essential parts of residential AC refrigerant service.
Before You Handle Refrigerant: Certification and Safety
Working on your own equipment does not exempt you from refrigerant-handling requirements. In the United States, attaching gauges and adding refrigerant to a typical residential central AC system are activities covered by EPA Section 608 technician certification requirements.
You do not have to own an HVAC business to become certified. You do need the appropriate certification, suitable equipment, and the knowledge to use it. The EPA explains the requirements on its Section 608 technician certification page. State or local requirements may also apply.
Refrigerant is under pressure and can cause serious cold burns. Use appropriate eye protection and refrigerant-rated gloves, and follow the equipment, refrigerant, cylinder, and manifold instructions. A small bottle does not make refrigerant harmless.
This is an educational explanation of one service job, not a universal charging procedure for every air conditioner. If you cannot identify the refrigerant, the charging method, or the correct valve arrangement, stop before opening anything.
Check These Three Things Before Assuming Your AC Is Low
1. Check the outdoor condenser coil
We started by cleaning the outdoor coil because it was dirty. After cleaning, the high-side pressure, also called head pressure, dropped significantly. Subcooling changed as well.
That matters. A dirty condenser changes how the system rejects heat, which affects the readings you are using to evaluate the refrigerant charge. You want clean equipment and stable operating conditions before deciding that a pressure or temperature reading means you need more refrigerant.
2. Check the indoor air filter
This system had been freezing while using a Filtrete 1600 filter, identified here as approximately MERV 12. We replaced it with a MERV 8 filter to reduce the airflow restriction.
Filter ratings can be confusing because a manufacturer's product number is not necessarily its MERV rating. Also, MERV 12 does not automatically mean hospital-grade filtration, and a higher-MERV filter does not automatically cause freezing. The important question is whether the filter's resistance is appropriate for your blower, ductwork, and filter size.
My usual starting recommendation is a MERV 8 filter where it meets the equipment requirements. If you need better air cleaning, evaluate an appropriate air-cleaning solution rather than assuming a more restrictive filter is always the best upgrade.
A filter that restricts airflow too much can contribute to evaporator freezing. Adding refrigerant will not correct that airflow problem.
3. Check the indoor evaporator coil
A clean filter does not guarantee a clean evaporator coil. If the coil is partially plugged with dust and debris, airflow can still be restricted, and your operating pressures can still be misleading.
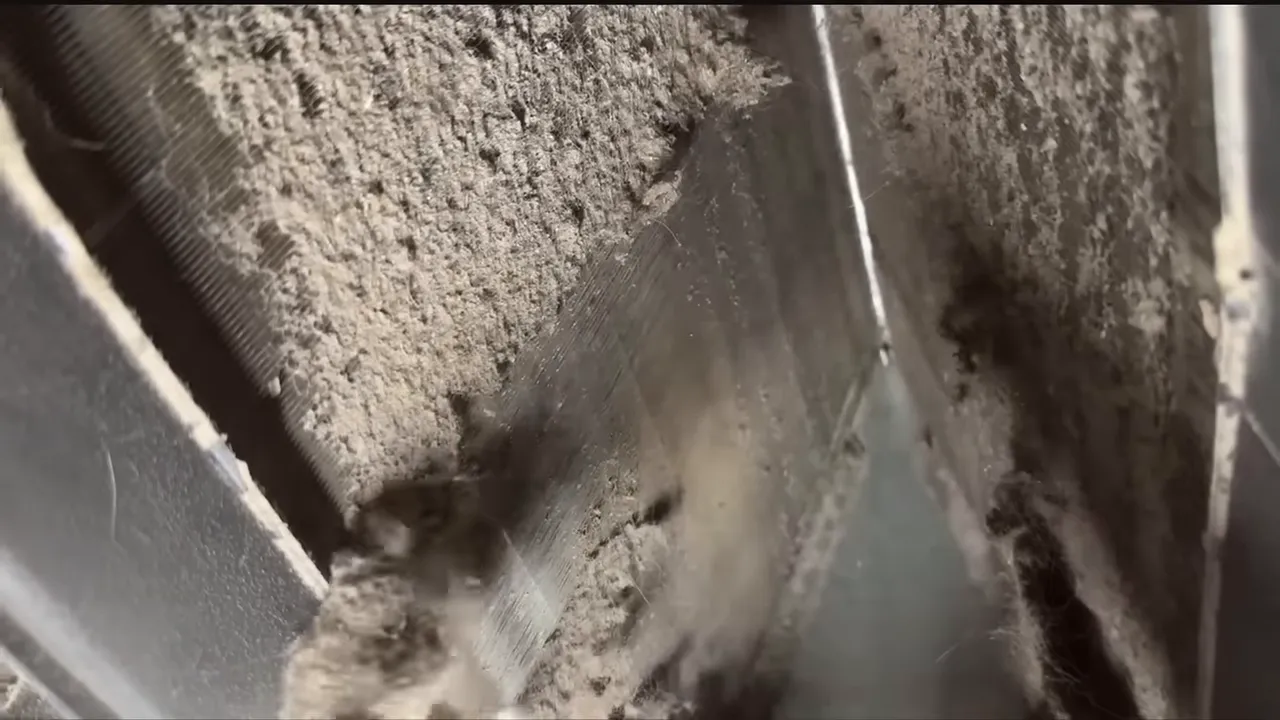
Get those basics right before adjusting the charge: clean outdoor coil, appropriate filter, and a clean indoor coil. If the system is iced up, the ice also needs to be cleared before meaningful charging checks can be made.
Why I Like Digital Gauges for Checking AC Charge
A digital manifold with temperature clamps makes this job much easier to evaluate. The gauges measure refrigerant pressure, while the clamps measure the liquid-line and suction-line temperatures. With the correct refrigerant selected, the manifold can calculate subcooling and superheat.
- Subcooling is the difference between the refrigerant's condensing saturation temperature and the measured liquid-line temperature.
- Superheat is the difference between the measured suction-line temperature and the refrigerant's evaporating saturation temperature.
Those measurements provide more useful information than pressure alone. They still need to be interpreted using the manufacturer's charging instructions and the system's operating conditions.
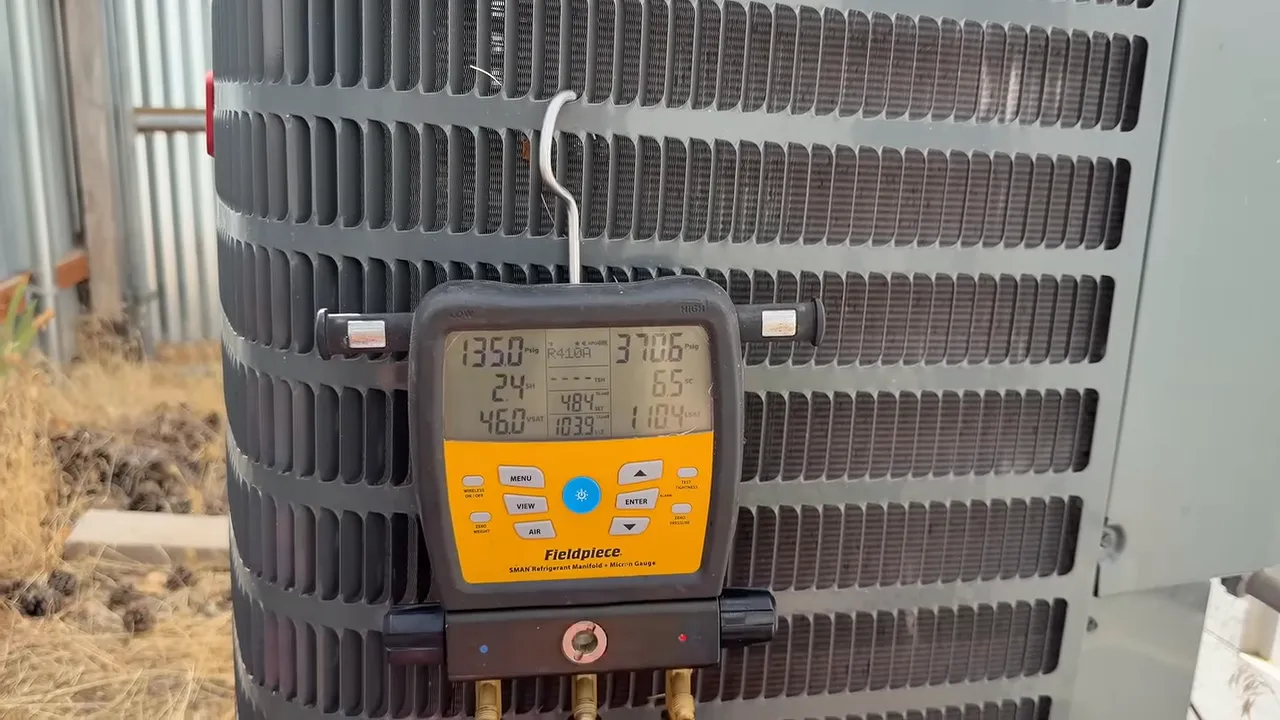
For this particular job, we were using subcooling to guide the adjustment. The initial reading was about 6.5°F, and our target was approximately 10°F to 11°F.
That is this system's target, not a number to apply to every AC. Confirm the required charging method and target on the equipment label or in the manufacturer's service information. Digital gauges calculate readings; they do not choose the correct target for you.
Preparing the Refrigerant and Charging Hoses
The refrigerant used here was R-410A, supplied in a small 2-pound cylinder. The supplier discussed also offered 5-pound and 20-pound cylinders. A smaller container can be convenient for a minor adjustment, but container size does not tell you how much the system needs.
Always match the refrigerant to the equipment. This R-410A example should not be treated as an interchangeable procedure for an R-22 system or another refrigerant.
The setup used a digital manifold, line-temperature clamps, service hoses with low-loss fittings, and a yellow supply hose connected to the refrigerant cylinder.
Before charging, air must be kept out of the hose assembly and refrigerant circuit. Air and moisture are contaminants you do not want to introduce into the system. Use the appropriate hose evacuation or permitted purging procedure for your equipment and training.
Do not treat deliberately releasing refrigerant as a general-purpose preparation or cleanup method. The EPA's refrigerant venting guidance explains the prohibition and the limited allowance for unavoidable releases associated with good-faith servicing.
Making the Charge Adjustment in Small Increments
With the airflow checks complete and subcooling still below the target, we added refrigerant gradually while monitoring the manifold.
In this setup, the cylinder was inverted to supply liquid refrigerant, and flow was carefully metered through the low side. That detail needs some explanation: supplying liquid from a cylinder is not permission to send an unrestricted stream of liquid into a compressor.
The process followed a simple pattern:
- Introduce a small, controlled amount using the equipment-approved charging method.
- Stop the refrigerant flow.
- Allow several minutes for the system readings to stabilize.
- Recheck subcooling and the other operating readings before deciding whether another adjustment is needed.
The manifold's sight glass showed refrigerant moving during the addition. That was useful confirmation of flow, but it was not the stopping point. The stabilized measurements were what mattered.
Why the accumulator does not eliminate compressor risk
This outdoor unit had a suction accumulator next to the compressor. Its job is to help separate and retain liquid refrigerant so vapor can return to the compressor.
That offers protection, but it is not unlimited protection. Too much liquid entering too quickly can overwhelm that protection and cause liquid slugging, potentially damaging the compressor. Not every system has the same arrangement, either.
That is why we made small additions and waited between them. Follow the manufacturer's charging procedure rather than relying on the presence of an accumulator.
The final subcooling reading
After the incremental additions and stabilization time, subcooling reached approximately 10.9°F to 11°F. That was the target for this job, so we stopped adding refrigerant and closed the cylinder valve.
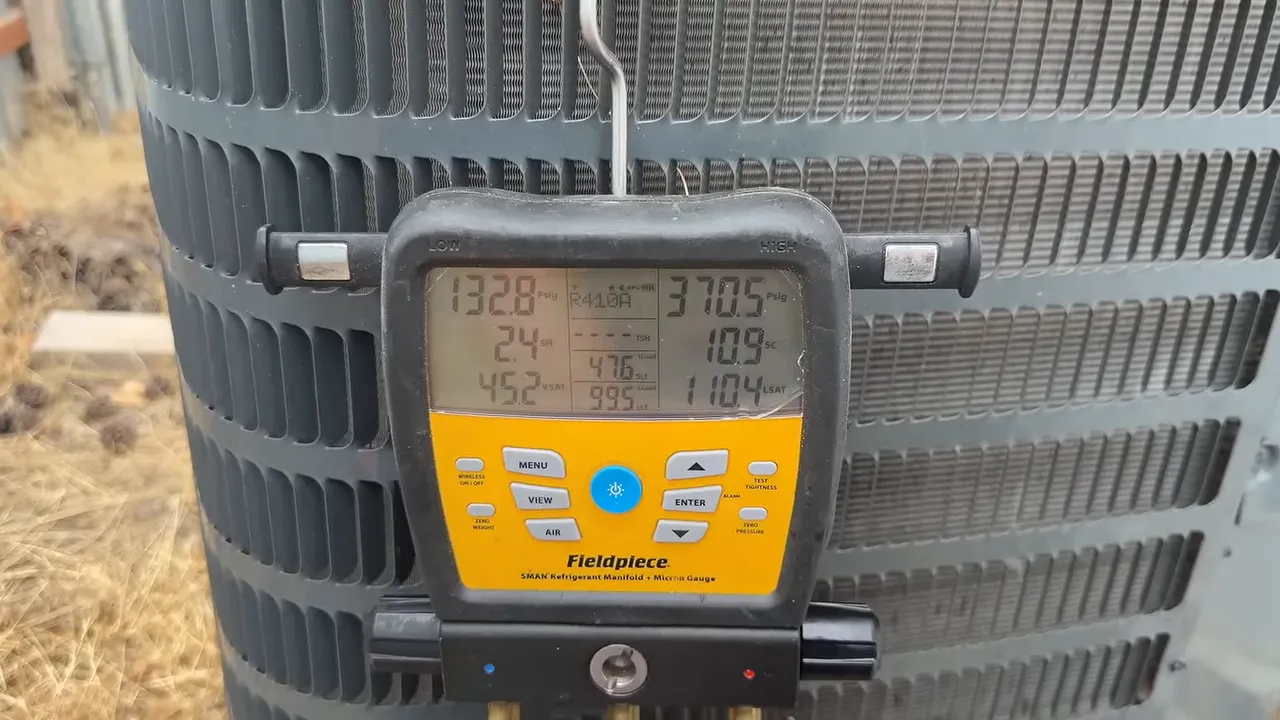
Do not keep charging because a cylinder still contains refrigerant or because you want a little extra cooling. More refrigerant is not automatically better.
Removing the Gauges Without Wasting the Hose Charge
Finishing the charge is only part of the job. The hoses still contain refrigerant, and the high-side hose can retain substantial pressure.
Here, after disconnecting the high-side hose with its low-loss fitting, the manifold showed roughly 358 psi trapped in that hose. Low-loss fittings greatly reduce the release at disconnection, but they do not make the hose empty or pressure-free.
With the high-side hose already disconnected from the system and sealed by its fitting, and the refrigerant source isolated, we used the manifold to return much of that trapped refrigerant through the still-connected suction hose. The hose pressures moved toward the low-side pressure, roughly 130 to 140 psi during this portion of the job.
That distinction is critical. This was a hose-charge return procedure, not an instruction to open both manifold valves while both hoses remain connected to the operating system.
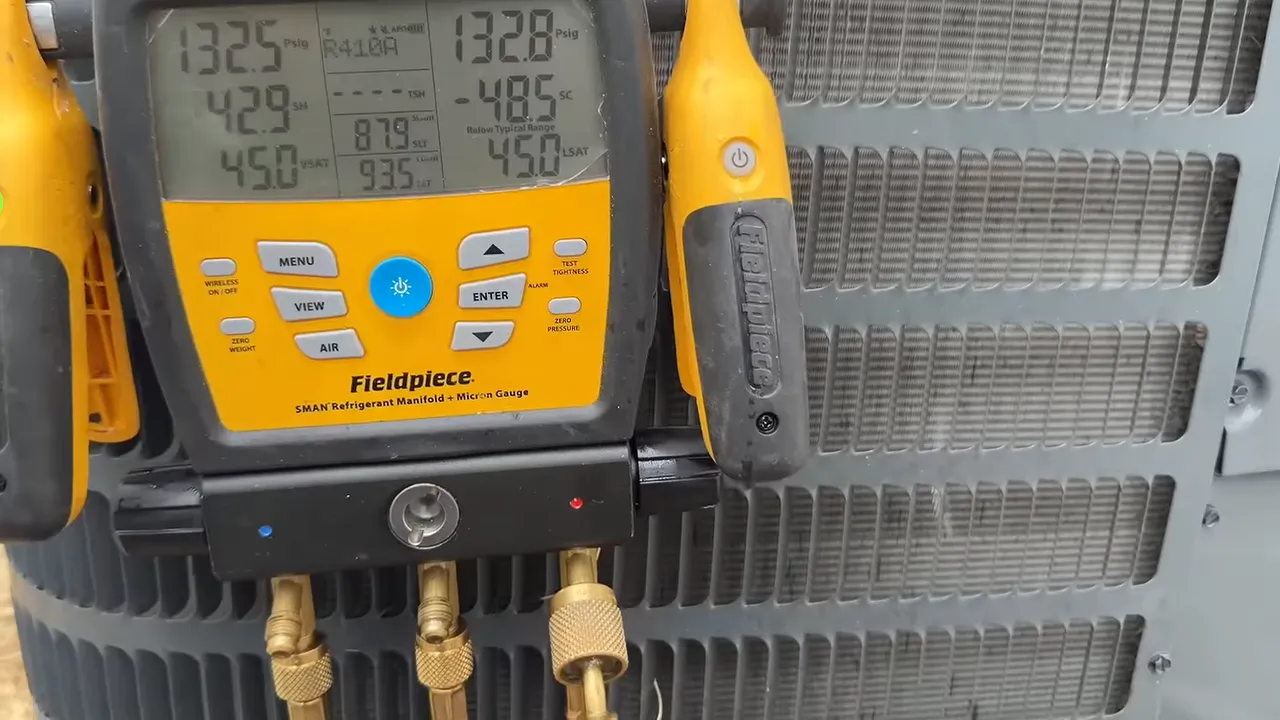
Use the manifold manufacturer's approved procedure to manage the remaining hose charge, then isolate and disconnect the equipment as instructed. Return or recover refrigerant as required, check the service connections, and reinstall the service-port caps.
Do not assume that refrigerant may be deliberately vented simply because it is in a hose or the quantity seems small. The goal is to minimize releases through proper servicing practices, not to bleed the gauges to atmosphere.
The Real Skill Is Knowing Whether Refrigerant Is Needed
You do not have to own an HVAC company to earn the appropriate EPA certification and learn to service your own equipment. But recharging a home AC takes more than connecting a bottle and opening a valve.
On this job, the useful sequence was clear: correct the coil and airflow issues, measure the system, make a small controlled adjustment, allow it to stabilize, and remove the service equipment with minimal refrigerant loss.
Start with diagnosis, not the refrigerant cylinder. That is how you avoid charging around an airflow problem and give yourself a much better chance of getting the job right. Be safe, and happy HVAC'ing.


